How is it possible that a volume of 200 TB can be created on a Diskstation from 2012 with only 4 GB of built-in RAM, while today's Synology NAS systems apparently require at least 32 GB of RAM?
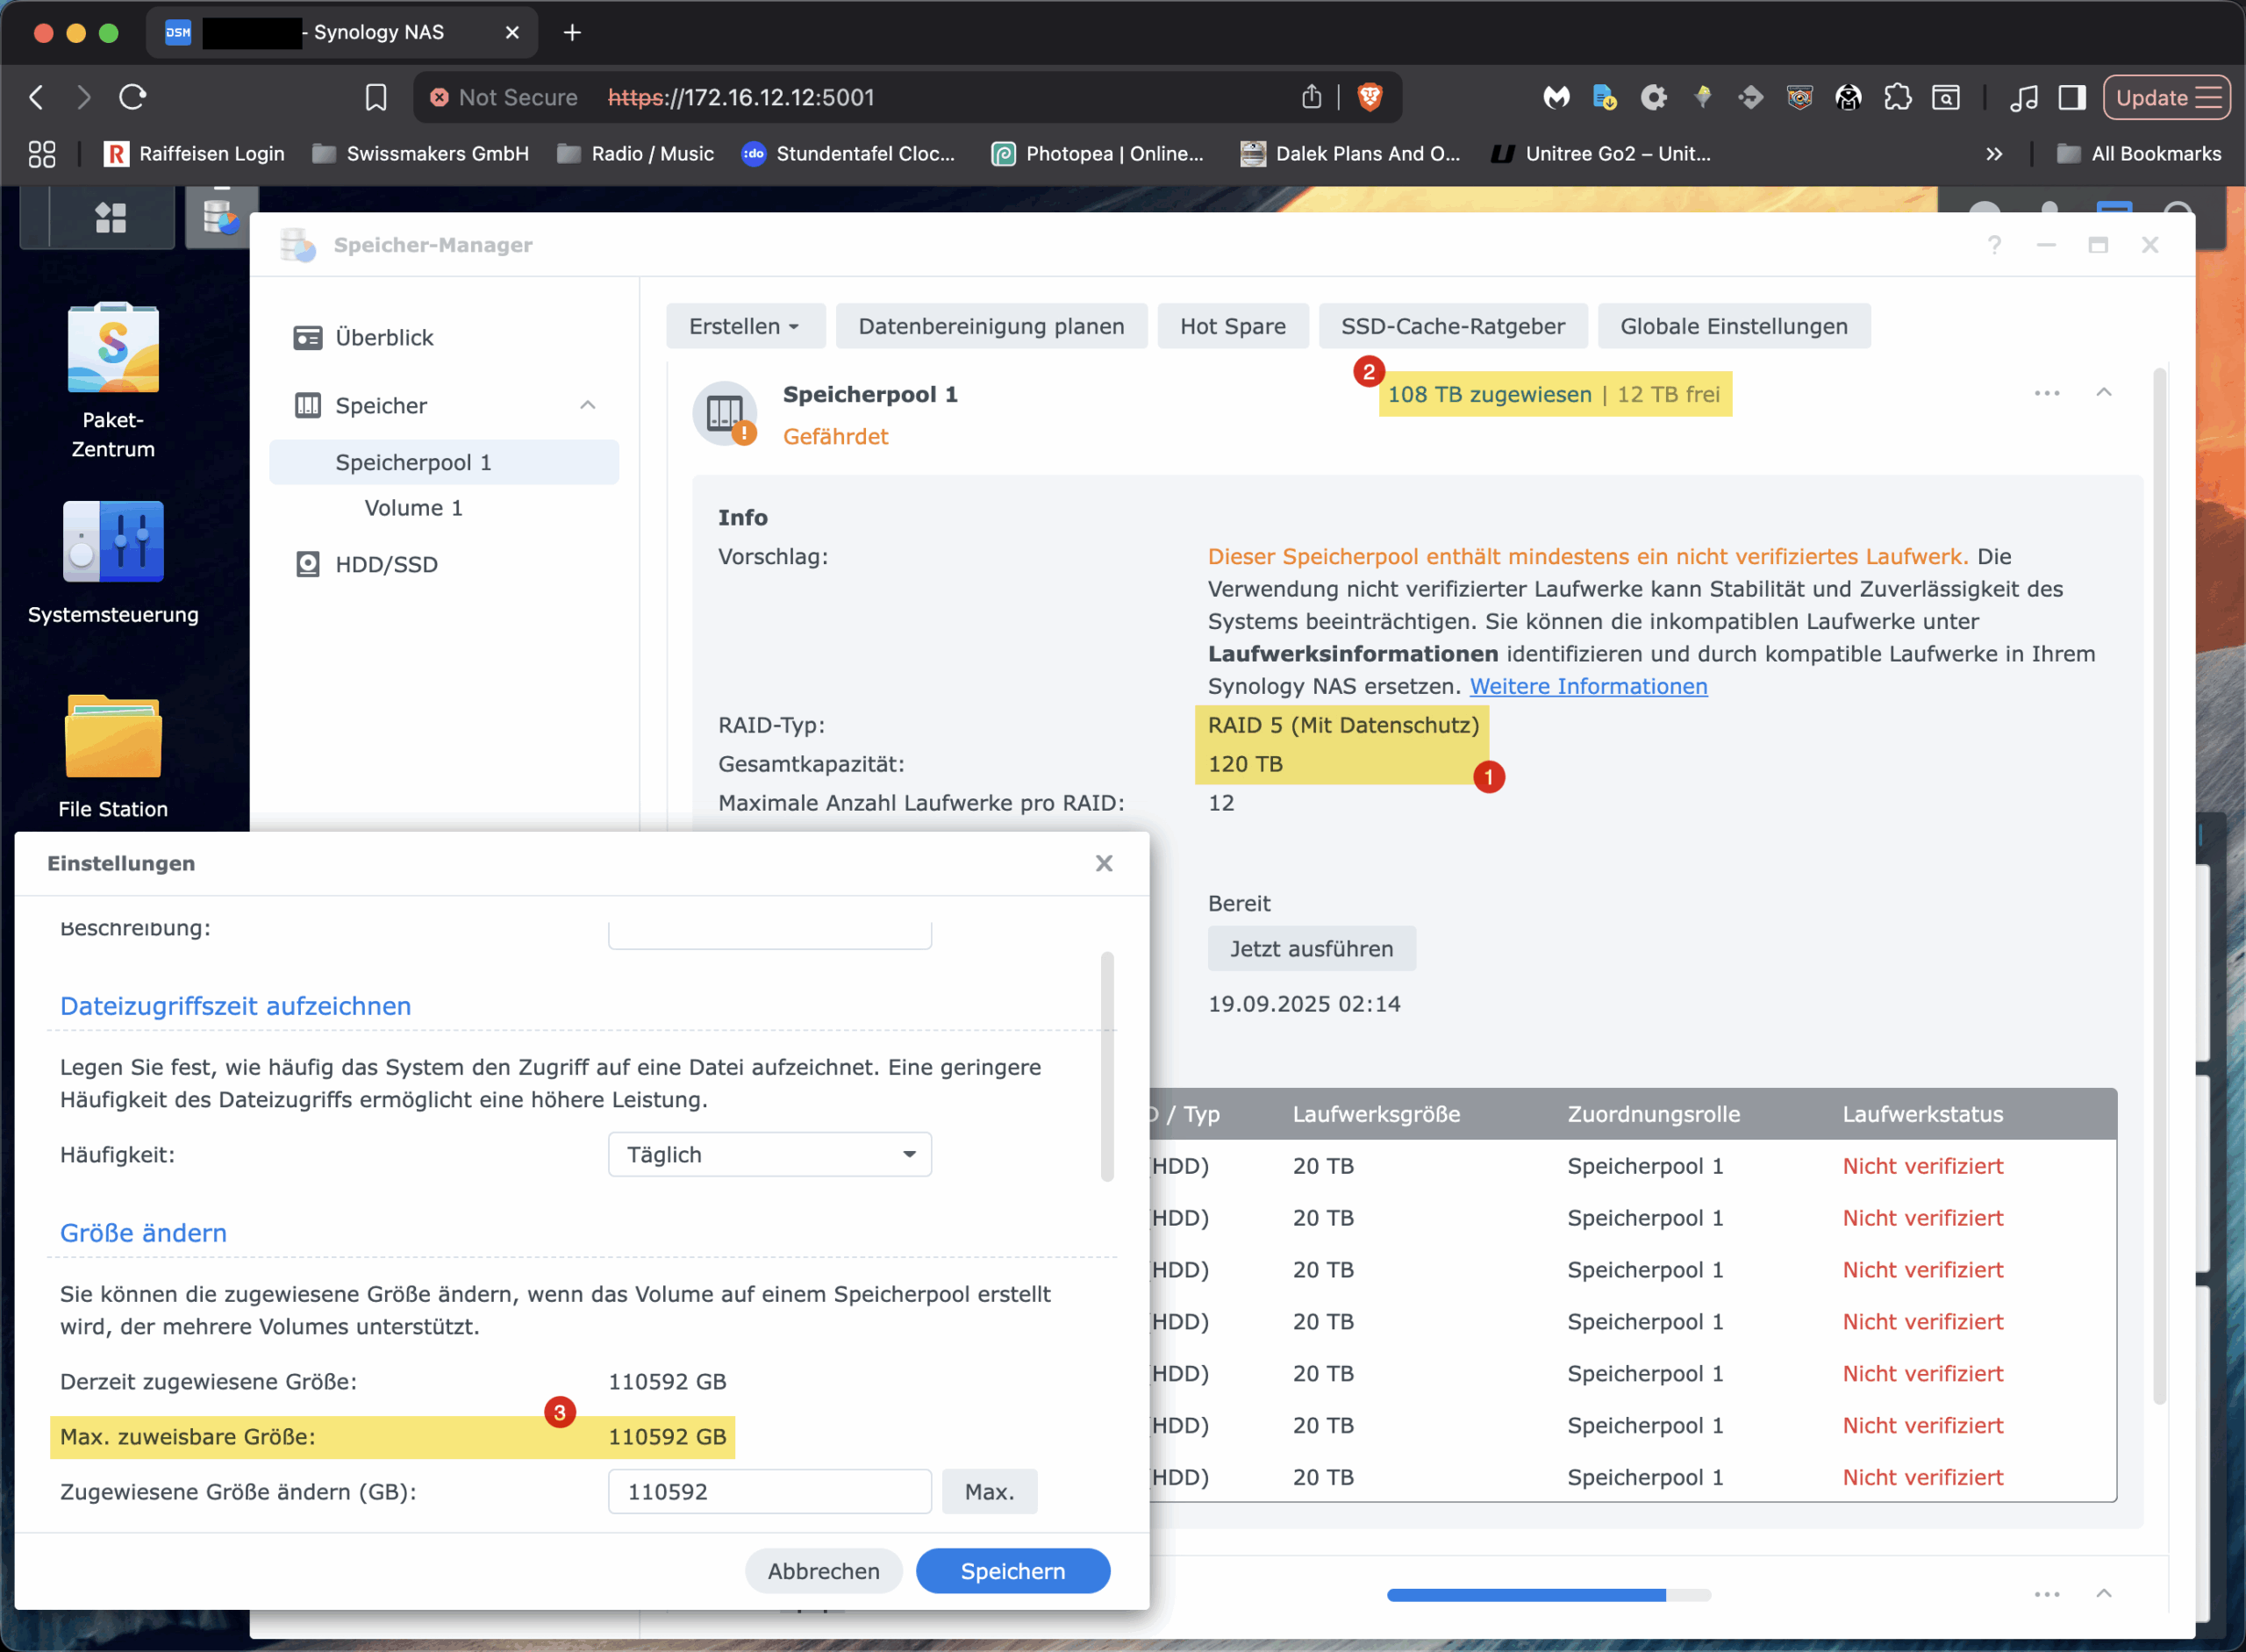
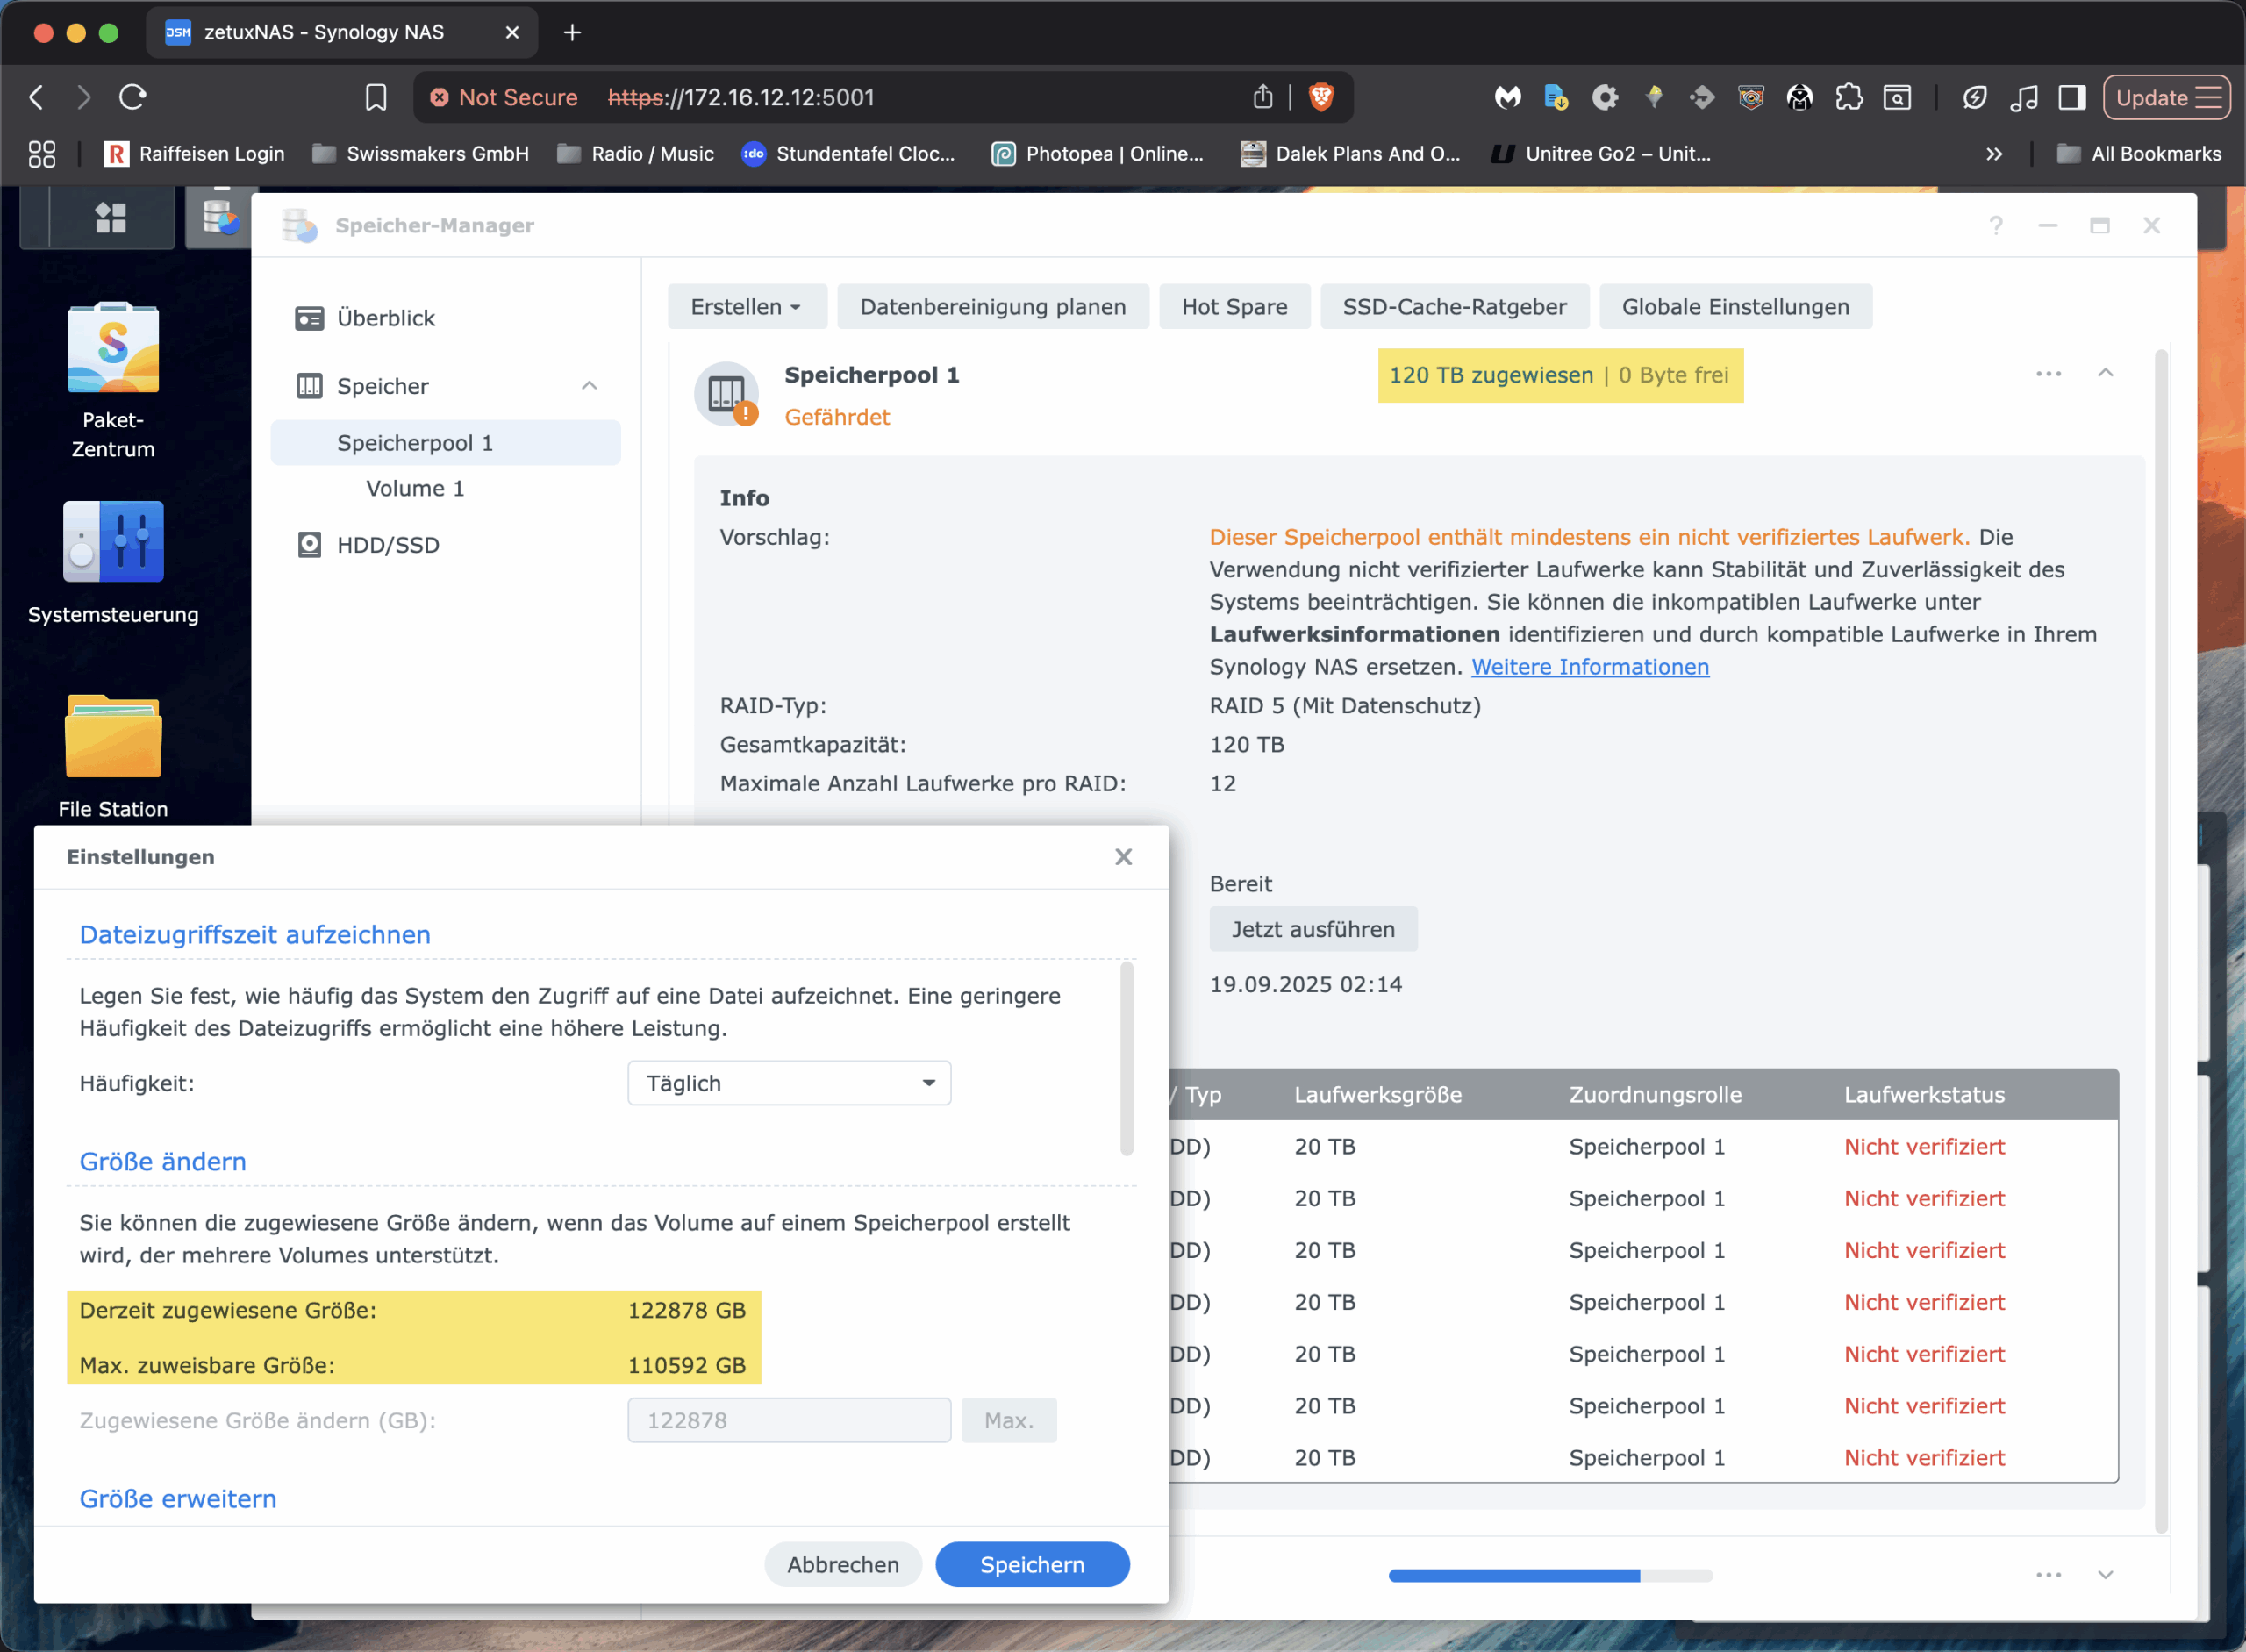
I was recently faced with this question when we were confronted with a familiar but irritating phenomenon during one of our Swissmakers installations: A Synology NAS with seven 22 TB HDDs in RAID-5 correctly displayed around «120 TB» in the storage pool (1), but did not allow the existing volume to be increased above approx. 108 TB (2/3). The interface offered no option, although the pool still had free capacity. For all those who observe similar problems and run into an invisible ceiling in the GUI: This is No technological limit of Btrfs or LVM and has nothing to do with the RAM configuration. It is a model-dependent software limit in the DSM interface. In this article, I will show you why this is the case and how you can still extend the Synology volume beyond this limit cleanly and online via CLI.
The facts
Let's start with the numbers. Hard drive manufacturers calculate in decimal: 1 TB are 10¹² bytes. operating systems and also the DSM perform binary calculations: 1 TiB are 2⁴⁰ bytes. A 22 TB disc therefore corresponds to around 20.0 TiB in real terms. Seven of these drives in RAID-5 result in a gross total of around 140 TiB; one disc is omitted for parity, leaving a net total of around 120 TiB in the pool. At this point, everything is still coherent. The stumbling block comes later, at the volume level.
Synology organises its system like this: An mdadm RAID runs at the bottom, followed by an LVM with a volume group (called „vg1“ on many devices), and then the actual file system, in our case Btrfs. DSM deliberately separates the storage pool from the volume. The pool represents the physical capacity of the RAID set; volumes are LVM logical volumes to which capacity from the pool is allocated via the GUI. And this is exactly where DSM a model-dependent upper limit for the size of a single volume, which is available for many Plus models and other models at 108 TiB lies. That is no technical necessity of LVM or Btrfs, but a software barrier deliberately placed in the interface by Synology. The evidence for this is trivial: The pool shows free extents and LVM can attach them to the existing LV; the Btrfs can then be resized online, completely without reformatting, downtime or other «magic» steps.
Btrfs itself is not the limiting factor in this constellation. The file system supports online resizing, has a chunk-based structure and manages data and metadata in separate areas. It scales to capacities far above what a 7-bay configuration can actually deliver. The block-device issue is also not critical with LVM: as long as the VG has free extents, the LV can be enlarged. Neither the CPU architecture of a Plus model nor the amount of RAM determine the maximum addressable size of a Btrfs volume. More RAM helps caches and therefore performance, but it does not change the address widths of the layers involved. So if you get stuck in the DSM mask at «Max. assignable size 110 592 GB», you will encounter a UI restriction, but not a technical limit.
The solution
The solution lies in the toolbox that we Linux engineers use every day anyway: We extend the logical volume with LVM and then add the Btrfs. The system remains in operation; services, shares and NFS/SMB clients continue to work. The procedure is the same for every UNIX-based system that uses LVM: first verify the actual state beyond doubt, enlarge the LV, and finally resize the file system to 100% of the size of the LV. I will write down all the specific commands in a moment so that you can carry out the individual steps directly in your own environment.
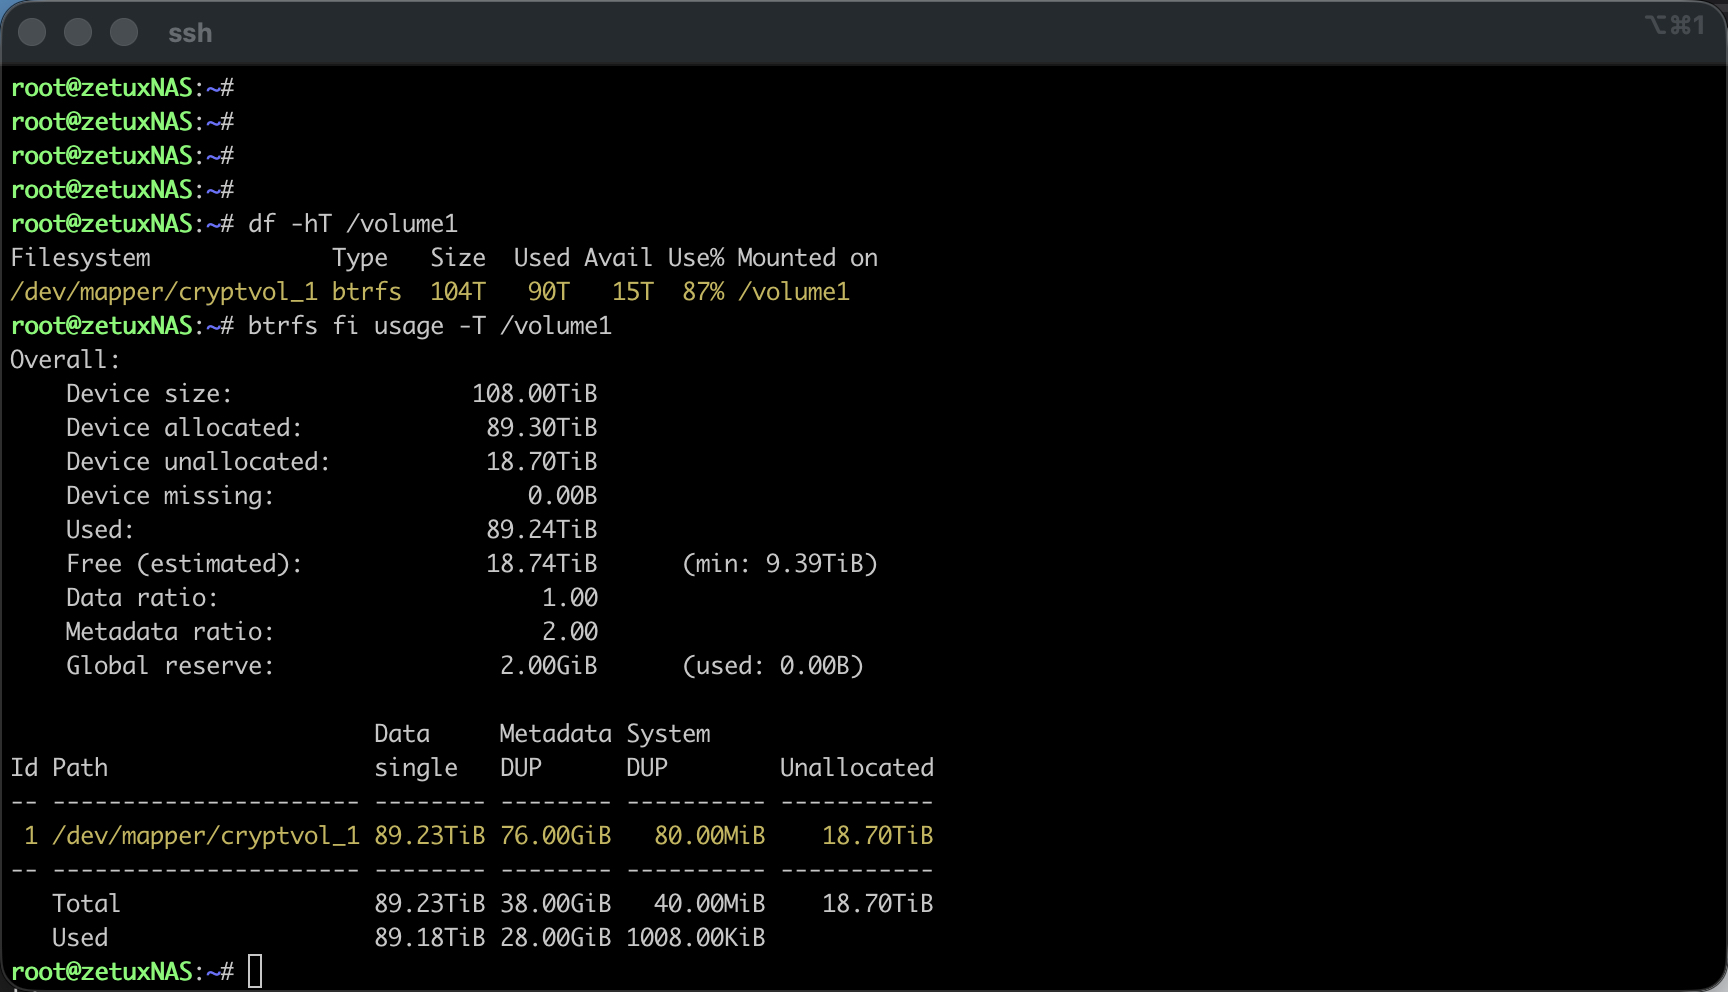
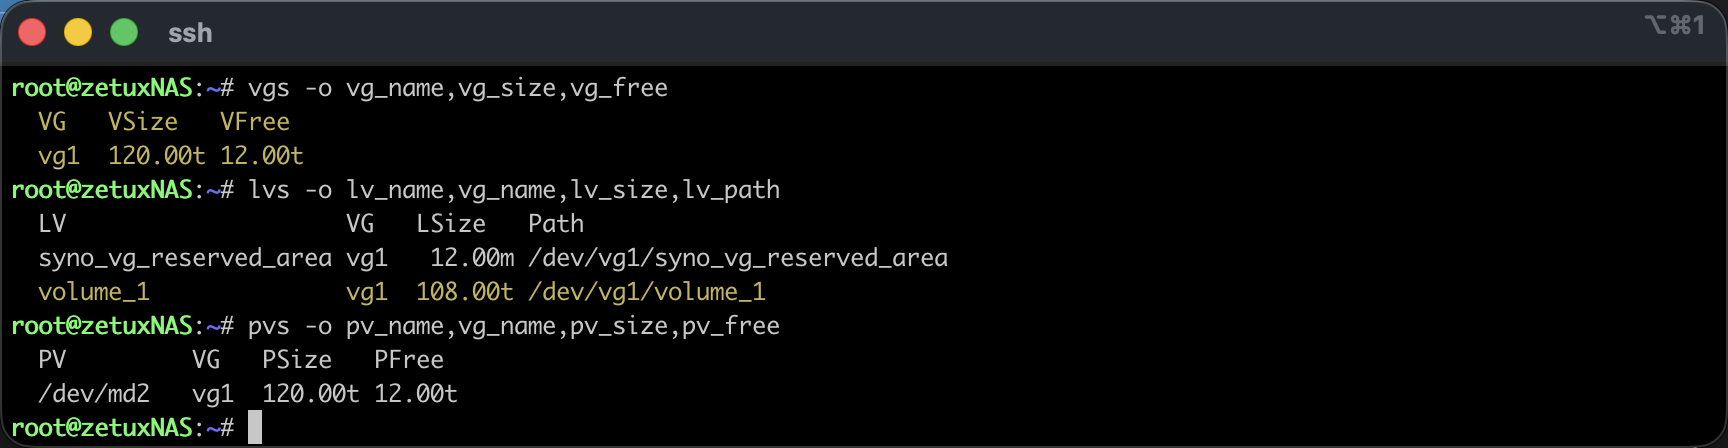
First I choose the secure access via SSH and escalate to root (How exactly this can be done has already been described here: Link). I then check the storage layers involved.# df -hT /volume1 confirms the file system and the mount point, # mount | grep volume1 shows the actual device file, which Synology usually uses for encrypted volumes via the mapper as /dev/mapper/cryptvol_1 is integrated. With # vgs -o vg_name,vg_size,vg_free,# lvs -o lv_name,vg_name,lv_size,lv_path and # pvs -o pv_name,vg_name,pv_size,pv_free I clarify the name of the volume group, which logical volumes exist and how many free extents are actually available in the pool. At this point, «VFree» should show an order of magnitude around the 12 TB displayed in the GUI, «12.00t» free; the exact lv_path, mostly /dev/vg1/volume_1.
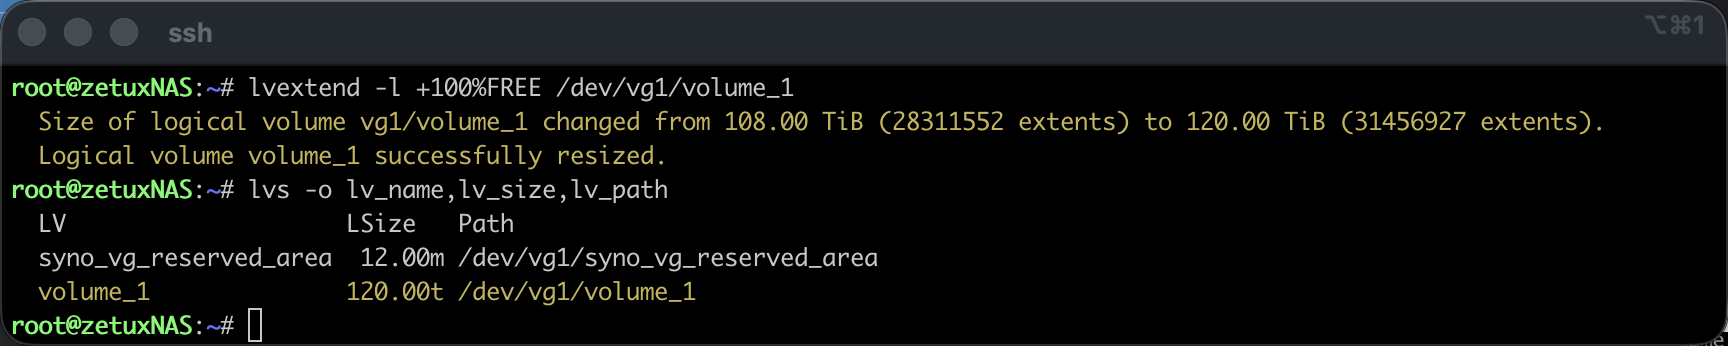
If the initial situation is clear, the LV can be extended. A single call is sufficient for this, which attaches all free extents of the VG to the target LV. With a path specification from the lvs output, it looks like this:
lvextend -l +100%FREE /dev/vg1/volume_1The option -l works with extents and is more robust in this situation than an exact size specification in bytes; in combination with 100% it consumes exactly the free area of the VG, regardless of rounding. An immediately following # lvs -o lv_name,lv_size,lv_path shows the new LV size. Up to this point, nothing has changed in the file system, we have only extended the block device layer.
Reboot (Recommended)
A reboot is not necessary in all cases, but if the Volume1 was additionally encrypted or the Synology supports the installation of a cache, then even before the btrfs resize the dm-crypt/LUKS device (cryptvol_1) as well as the underlying cachedev_0 to the new LV size. A brief check is carried out using: # dmsetup ls --tree
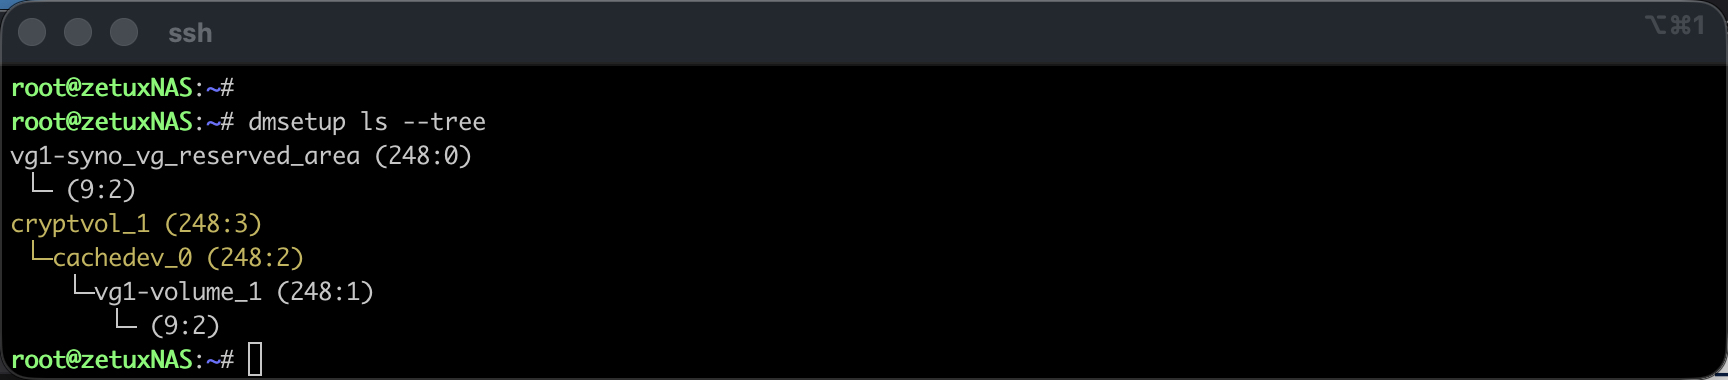
If one or both of the above virtual devices are displayed, a reboot is recommended. To cachedev_0 as both cryptvol_1 can be enlarged online as an alternative as follows: (Without a reboot - but not without risk)
# Query current sector size of cachedev_0:
dmsetup table --showkeys cachedev_0
# Get new sector size from LV:
SECTORS=$(blockdev --getsz /dev/vg1/volume_1)
# suspend cachedev_0, reload cachedev_0 table with new length and reactivate:
dmsetup suspend cachedev_0
dmsetup table --showkeys cachedev_0 \
| sed '/^Size Hist:/,$d' \
| awk -v S="$SECTORS" 'NR==1{$2=S} {print}' OFS=" " \
| dmsetup reload cachedev_0 --table -
dmsetup resume cachedev_0
# If available, resize LUKS/dm-crypt to new size of cachedev_0:
cryptsetup resize cryptvol_1
# Check whether cachedev_0 (and cryptvol_1) have been successfully resized:
dmsetup table --showkeys cachedev_0
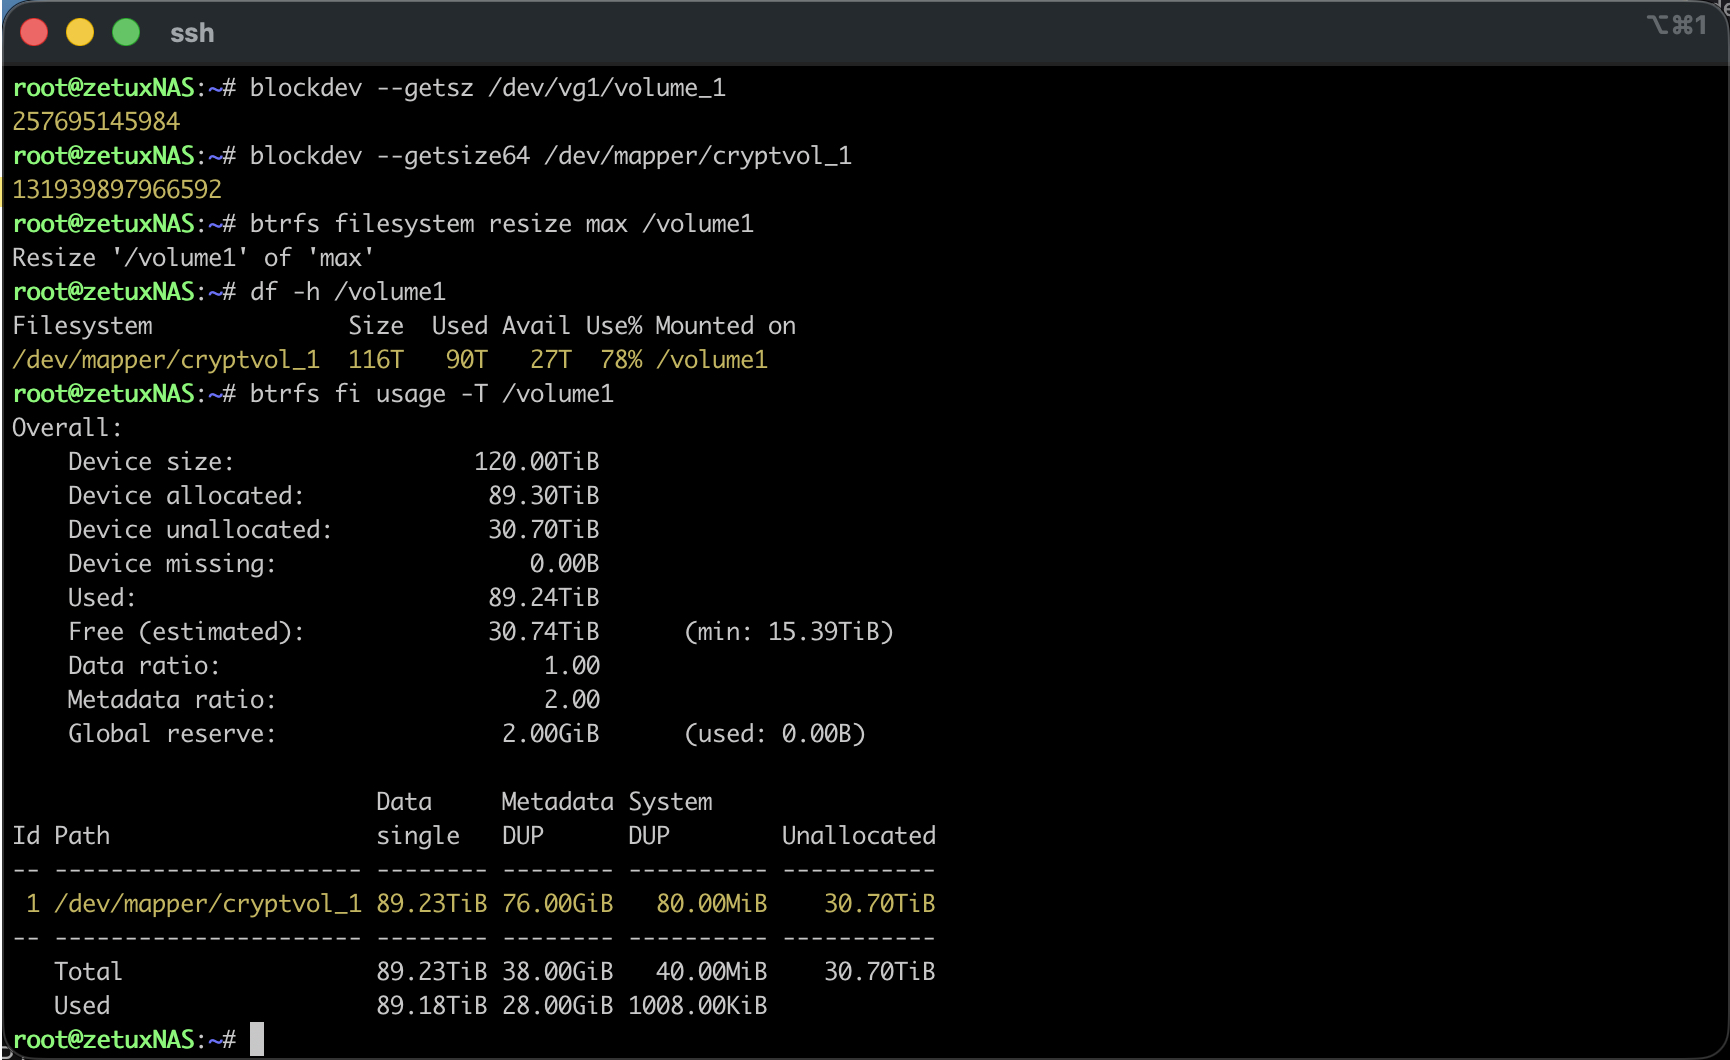
blockdev --getsize64 /dev/mapper/cryptvol_1Resize the file system
After the reboot or the manual resize of the cachedev_0 and susceptible cryptvol_1, I now inform the Btrfs about the additional space. This works online via the mount point. If you want to use the maximum available size in FS, take the convenient option:
btrfs filesystem resize max /volume1Alternatively, a specific difference can be specified, for example +12t. After a few moments # df -h /volume1 the increased capacity, and # btrfs fi usage -T /volume1 shows the new free area at the level of the Btrfs chunks. The entire process runs without interrupting the shares.
Depending on the fill level, it is then worth performing a light balance run, which only touches heavily occupied chunks in order to smooth the distribution without keeping the system unnecessarily busy:
btrfs balance start -dusage=5 -musage=5 /volume1
btrfs balance status /volume1
The balance step is optional; it ensures that future allocations do not fail due to legacy data, e.g. if data and metadata are unevenly distributed. It is particularly useful for very large file systems with a long history, but is often not necessary in fresh setups.

Back in the DSM interface, the Volume then with the new, full size is displayed. The «Change size» dialogue will continue to state the known upper limit as the «Max. assignable size»; however, this only applies to the DSM Disk Wizard. Future extensions will run in the same way via LVM and btrfs filesystem resize. If you want to accompany the operation in a controlled manner, monitor # dmesg -w and the Btrfs statistics while the change takes effect.
A word on safety belongs in this context: Even if the path is technically clean, it remains «not supported» by Synology in this form. As always, a current, tested backup is a prerequisite for productive volumes. The procedure does not change any data content, but it operates on different storage layers that are responsible for everything above them. If you operate several volumes in the same pool, makes sure before the Extend, that he gets the right LV; the unique lv_path check before the actual command is the decisive protection against typos.
Conclusion
The apparent contradiction between free memory in the pool and a rigid limit for the volume is not an indication of a limit of Btrfs, LVM or the hardware and certainly not a question of RAM equipment. It is a manufacturer and GUI-side barrier in DSM that limits the disc wizard, not the underlying technology. If you understand this, you can enlarge an existing volume online and without downtime by extending the logical volume using lvextend and resizing the Btrfs using btrfs filesystem resize. The capacity is then available where it belongs: in the file system, where the data is stored. For me, this is the most pragmatic way to utilise large pools on all Synology devices without falling for the artificial 108 TiB cap.