Simple Markdown panel
This first example is just to show the procedure.
Dashboard as a template
A dashboard with one or more markdown panels can be used as a simple example that does not make any data queries. In practice, dashboards that only contain Markdown panels are probably rarely used, but the procedure can be demonstrated well and the examples are easy to follow. Here is the screenshot of the interactively created dashboard template for the first example:
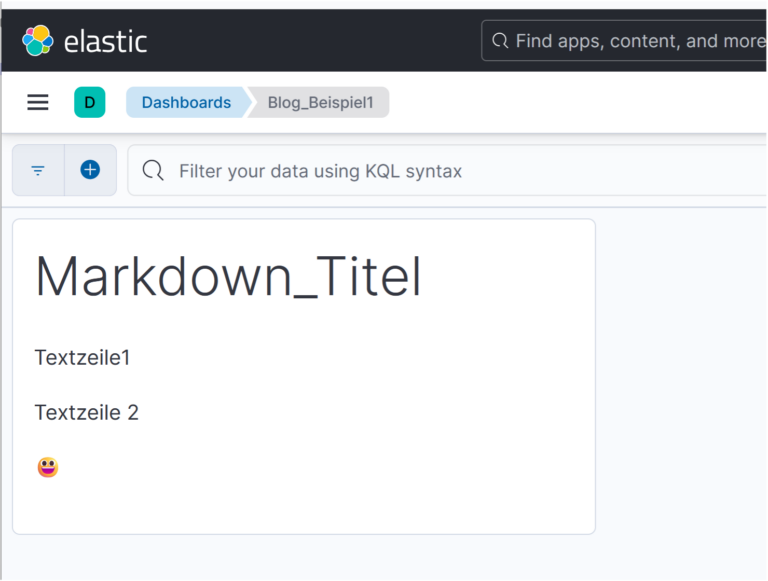
This dashboard is now exported and saved as a blog_example1.ndjson saved.
Input file with variables
As json files are otherwise also used, it makes sense to also save the variables in a new json file blog_example1_vars.json to define. It is recommended that you also define the title or name of the dashboard - in this example, the "title" is "Blog_Example1" in the ndjson file - in the input file and choose a new name so that the original dashboard is not overwritten during import if no new ID is generated.
Here is an example of the file content in which all texts of the Markdown panel are defined:
{
    "markdown": {
        "title": "Markdown_Title",
        "textlines": ["textline1", "textline2","😃"]
    },
    "dashboard_title": "generated_dashboard_blog_example1"
}
Reshaping the ndjson file with the dashboard
Then it is best to make a copy of the file with the dashboard, here with the name blog_example1.j2.
The line with the dashboard definition is now copied to another new file blog_example1.jsonto make it easier to edit. Open this new file in VSCode and format it with <ctrl><alt><b> (vscode-json: Beautify). In addition, line breaks and the character string --> can be appended to commas to provide a better overview. The line breaks and the character string can be easily removed again later.
The part of the file with the definition of the Markdown panel then looks something like this:
...
    "panelsJSON": "[{\"type\":\"visualization\",
------>\"gridData\":{\"x\":0,
------>\"y\":0,
------>\"w\":20,
------>\"h\":9,
------>\"i\":\"09747f18-d4b6-4cb0-a25e-63abf3a9cce8\"},
------>\"panelIndex\":\"09747f18-d4b6-4cb0-a25e-63abf3a9cce8\",
------>\"embeddableConfig\":{\"enhancements\":{\"dynamicActions\":{\"events\":[]}},
------>\"savedVis\":{\"id\":\"\",
------>\"title\":\"\",
------>\"description\":\"\",
------>\"type\":\"markdown\",
------>\"params\":{\"fontSize\":12,
------>\"openLinksInNewTab\":false,
------>\"markdown\":\"# Markdown_Titel\\n\\nTextzeile1\\n\\nTextzeile 2\\n\\n😃\"},
------>\"uiState\":{},
------>\"data\":{\"aggs\":[],
------>\"searchSource\":{\"query\":{\"query\":\"\",
------>\"language\":\"kuery\"},\"filter\":[]}}}}}]",
    "timeRestore": false,

        ],
        "timeRestore": false,
        "title": "Blog_Example1",
        "version": 2
    },
...
Attention, the Backslashes before the quotation and closing characters and before backslashes must still be present after the file has been reshaped.
Inserting jinja2 elements
Now the file blog_example1.json references to the variables from the input file are inserted. The documentation for jinja2 can be found on the following website, as previously mentioned: https://jinja.palletsprojects.com/en/stable/templates/. To insert the value of an element of the input file, it is sufficient to enter the name of the variable in double curly brackets.
"markdown": "# Markdown_Title\n\nTextline1\n\nTextline 2\n\n😃"must be adjusted as follows for the above input file:
"markdown": "# {{ markdown.title }}\n\n{{ markdown.textlines.0 }}\n\n{{ markdown.textlines.1 }}\n\n{{ markdown.textlines.2 }}"markdown.textlines is defined as an array and the numbers can be used to access the individual array elements. The line with the dashboard name (towards the end of the file before the version information) is then defined as follows:
"title": "{{ dashboard_title }}",Delete dashboard ID
Now you have to enter the dashboard ID in blog_example1.json otherwise there may be a conflict between the original dashboard and the dashboard generated with the new name. The ID is at the end of the file after the created_at:
    "created_at": "2024-11-26T16:56:50.240Z",
    "id": "2d77705c-912a-4730-a565-242f6ae43475",
You can simply delete the line with the ID.
Formatting as ndjson template
First, the inserted line breaks and character strings must be deleted again with a corresponding Replace all in the editor.
With the key combination (vscode-json: Uglify) can now convert the json into blog_beisiel1.json can be written to a single line again.
This line replaces the original line in blog_beisiel1.j2 and thus receives a template to regenerate the dashboard that was created interactively.
Generate and import dashboard
The new dashboard is now generated on the command line:
jinjanate blog_example1.j2 blog_example1_vars.json -o generated_dashboard_blog_example1.ndjsonIn Elastic, under the menu item "Management → Stack Management → Saved Objects", you can now view the newly generated files. generated_dashboard_blog_example1.ndjson can be imported. The option "Create new objects with random Ids" should be selected for the import. This results in the fewest conflicts, but you may end up with several objects with the same name, from which you can delete the old versions. You need to check which variant is easiest and whether the IDs at the top should not be deleted.
If you get a message like " 'generated_dashboard_blog_example' conflicts with an existing object." during import, you have a problem with ids and the new dashboard name.
The newly imported dashboard will then look exactly like the template in the screenshot above.
Generate multiple Markdown panels
The starting point is the same template as in example 1.
Input file with variables
The input file is extended with information for several Markdown panels. In addition to the text for the panels, the position and size are also defined. Here is the example file blog_example2_vars.json:
{
    "markdown": [
        {
            "title": "Swissmakers",
            "textlines": [
                "For the joy of technology",
                "Engeneering / Security / Consulting",
                "swissmakers.ch 😊"
            ],
            "position": [4,0],
            "size": [20,8]
        },
        {
            "title": "Codeatelier",
            "lines of text": [
                "We build your digital future",
                "Webdesign 🟢 SEO 🟢 Webapps 🟢 Webshops",
                "codeatelier.ch 😃"
            ],
            "position": [9,9],
            "size": [25,8]
        },
        {
            "title": "Swissmakers",
            "text lines": [
                "Your ITC specialists",
                "Engineering, Linux and network security",
                "swissmakers.ch 👍"
            ],
            "position": [0,18],
            "size": [35,8]
        }
    ],
    "dashboard_title": "generated_dashboard_blog_example2"
}
Reshaping the ndjson file with the dashboard
As in example 1, the file blog_example2.j2 so that it is easier to change. To obtain multiple Markdown panels, you can repeat the information for the panels in panelsJSON in the jinja2 template. In the part delimited by square brackets after panelsJSON, repeat the entire part of {\"type\":\"visualization\", up to \"filter\":[]}}}}} where a comma must be inserted between each of these panel definitions as a separator for array elements. However, there must not be a comma at the end of the array. The whole thing can be done in a first variant directly in the editor and then looks as follows:
        "panelsJSON": "[{\"type\":\"visualization\",
------>\"gridData\":{\"x\":0,
------>\"y\":0,
------>\"w\":20,
------>\"h\":9,
------>\"i\":\"09747f18-d4b6-4cb0-a25e-63abf3a9cce8\"},
------>\"panelIndex\":\"09747f18-d4b6-4cb0-a25e-63abf3a9cce8\",
------>\"embeddableConfig\":{\"enhancements\":{\"dynamicActions\":{\"events\":[]}},
------>\"savedVis\":{\"id\":\"\",
------>\"title\":\"\",
------>\"description\":\"\",
------>\"type\":\"markdown\",
------>\"params\":{\"fontSize\":12,
------>\"openLinksInNewTab\":false,
------>\"markdown\":\"# Markdown_Titel\\n\\nTextzeile1\\n\\nTextzeile 2\\n\\n😃\"},
------>\"uiState\":{},
------>\"data\":{\"aggs\":[],
------>\"searchSource\":{\"query\":{\"query\":\"\",
------>\"language\":\"kuery\"},
------>\"filter\":[]}}}}},
------>{\"type\":\"visualization\",
------>\"gridData\":{\"x\":0,
... ...
------>\"language\":\"kuery\"},
------>\"filter\":[]}}}}}]",
        "timeRestore": false,
        "title": "Blog_Example2",
        "version": 2
    },
    "coreMigrationVersion": "8.8.0",
Deleting the panel indices
A panel is assigned an index value in Kibana. These must be deleted (except for the first one), or the same index must not appear more than once, otherwise the panels will overwrite each other. The following lines in the file blog_example2.j2 must therefore still be deleted:
-----→\"panelIndex\":\"09747f18-d4b6-4cb0-a25e-63abf3a9cce8\",It is also best to delete the dashboard ID.
Inserting jinja2 elements
As in example 1, the variables from the input file can now be inserted. There is one more array level than in the first example and, in addition to the texts, the positions and the size of the panels must also be specified. This is what it looks like in extracts:
        "panelsJSON": "[{\"type\":\"visualization\",
------>\"gridData\":{\"x\":{{ markdown.0.position.0 }},
------>\"y\":{{ markdown.0.position.1 }},
------>\"w\":{{ markdown.0.size.0 }},
------>\"h\":{{ markdown.0.size.1 }},
... ...
------>\"markdown\":\"# {{ markdown.0.title }}\\n\\n{{ markdown.0.textline.0 }}\\n\\n{{ markdown.0.textline.1 }}\\n\\n{{ markdown.0.textline.2 }}\"},
... ...
For the other two panels it is then a case of {{ markdown.1. ... }} and {{ markdown.2. ... }}.
The name of the dashboard also needs to be adapted:
"title":"{{ dashboard_title }}"Further steps
Similar to example 1, the file blog_example2.j2 can be formatted as ndjson again.
The dashboard can then be generated with the command:
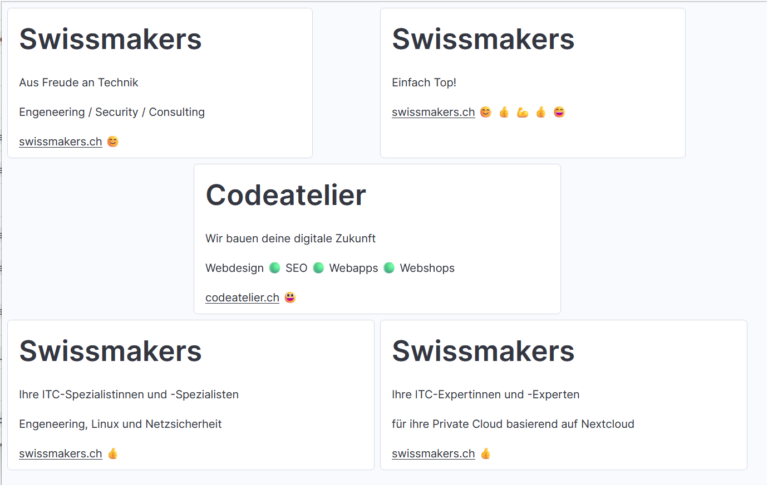
jinjanate blog_beispiel2.j2 blog_beispiel2_vars.json -o generated_dashboard_blog_beispiel2.ndjsonThe generated dashboard is then imported using the "Create new objects with random Ids" option. The result can be seen in the following screenshot:

Generate multiple panels in a loop
The dashboard from example 2 can also be generated a little more elegantly. Instead of stringing together the Markdown panels in the jinja2 template, the panels in example 3 can be generated in a loop. This solution offers more flexibility.
The input file with variables is initially a copy of blog_example3_vars.json of the input file of example 2, in which only the name or title of the dashboard is used. generated_dashboard_blog_example3 has been adjusted.
blog_example3.json is again the reformatted file with the originally interactively created dashboard, into which jinja2 elements are now inserted. The file is initially a copy of blog_example1.jsonwhich only contains the definition of a Markdown panel, not the file with the three panels from example 2. Here is the corresponding part of the file with the new jinja2 elements:
        "panelsJSON": "[{% for item in markdown %}{\"type\":\"visualisation\",
------->\"gridData\":{\"x\":{{ markdown[loop.index0]['position'][0] }},
------->\"y\":{{ markdown[loop.index0]['position'][1] }},
------->\"w\":{{ markdown[loop.index0]['size'][0] }},
------->\"h\":{{ markdown[loop.index0]['size'][1] }},
------->\"i\":\"09747f18-d4b6-4cb0-a25e-63abf3a9cce8\"},
------->\"embeddableConfig\":{\"enhancements\":{\"dynamicActions\":{\"events\":[]}},
------->\"savedVis\":{\"id\":\"\",
------->\"title\":\"\",
------->\"description\":\"\",
------->\"type\":\"markdown\",
------->\"params\":{\"fontSize\":12,
------->\"openLinksInNewTab\":false,
------->\"markdown\":\"# {{ markdown[loop.index0]['title'] }}\\n\\n{{ markdown[loop.index0]['lines of text'][0] }}\\n\\n{{ markdown[loop.index0]['lines of text'][1] }}\\n\\n{{ markdown[loop.index0]['lines of text'][2] }}\"},
------->\"uiState\":{},
------->\"data\":{\"aggs\":[],
------->\"searchSource\":{\"query\":{\"query\":\"\",
------->\"language\":\"kuery\"},
------->\"filter\":[]}}}}}{% if loop.index != loop.length %},{% endif %}
{% endfor %}]",
        "timeRestore": false,
        "title": "{{ dashboard_title }}",
        "version": 2
    },
In jinja2, a loop can be defined with the following elements:
{% for item in markdown %}
{% endfor %}
For each element in the array markdown in the input file, the entire part within the loop is then repeated. This produces the three panel definitions in the output.
As when customising the file for example 2, you must note that the panel definitions are in a json array, between the elements of which there must be a comma, but at the end of the array there must no longer be a comma. This can be achieved with a condition in jinja2:
{% if loop.index != loop.length %},{% endif %}If the loop index is not yet equal to the number of loops, the comma between the if condition and the {% endif %} is written to the output, but no longer in the last loop pass.
An alternative syntax is used here for specifying the array elements from the input file, in which the array levels are not separated by dots as used in example 1 and example 2, but are specified in square brackets. loop.index0 is a variable that is available within a for-loop and that specifies in which pass of the loop you are when you start counting with 0, in order to distinguish it from the variable used above. loop.indexwhere counting starts with 1. The name parts without quotation marks and closing characters are jinja2 variables whose value is used there, those with quotation marks and closing characters are the names from the json in the input file. Quotation marks and closing characters are therefore important and must be set correctly.
As in the other examples, the file must now be reformatted and saved as a complete template. blog_example3.j2 can be saved.
The command
jinjanate blog_beispiel3.j2 blog_beispiel3_vars.json -o generated_dashboard_blog_beispiel3.ndjsonthen generates a dashboard that looks exactly like the one in example 2.
New input file with variables
With the loop in the template, example 3 is now much more flexible than example 2. It is sufficient to adapt the input file to generate different numbers of Markdown panels in the dashboard. Of course, different input files can also be used with the same template, e.g. for different stages (dev, preprod, prod) etc.
Here is a new input file:
{
    "markdown": [
        {
            "title": "**Swissmakers**",
            "textlines": [
                "For the joy of technology",
                "Engeneering / Security / Consulting",
                "swissmakers.ch 😊"
            ],
            "position": [0,0],
            "size": [15,8]
        },
        {
            "title": "**Swissmakers**",
            "text lines": [
                "Simply top!",
                "swissmakers.ch 😊 👍 💪 👍 😄",
                ""
            ],
            "position": [18,0],
            "size": [15,8]
        },
        {
            "title": "**Code studio**",
            "lines of text": [
                "We build your digital future",
                "Webdesign 🟢 SEO 🟢 Webapps 🟢 Webshops",
                "codeatelier.ch 😃"
            ],
            "position": [9,9],
            "size": [18,8]
        },
        {
            "title": "**Swissmakers**",
            "text lines": [
                "Your ITC specialists",
                "Engineering, Linux and network security",
                "swissmakers.ch 👍"
            ],
            "position": [0,18],
            "size": [18,8]
        },
        {
            "title": "**Swissmakers**",
            "text lines": [
                "Your ITC experts",
                "for your private cloud based on Nextcloud",
                "swissmakers.ch 👍"
            ],
            "position": [18,18],
            "size": [18,8]
        }
    ],
    "dashboard_title": "generated_dashboard_blog_example3_b"
}
The following dashboard is generated from this using the same template without any further adjustments:
Automatic arrangement of panels
Example 4 is about showing a few more possibilities of jinja2 templates and automatically arranging panels in the dashboard in rows and columns.
A fixed number of Markdown panels are used, which are repeated depending on the desired number of panels in the dashboard.
Input file with variables
A copy of the input file from example 3 is used as the input file with variables. However, the size and position of the markdown panels are set uniformly for all panels and defined outside the markdown array in the json file. The desired number of markdown panels and the number of columns for the panels in the dashboard are also specified there. The width of the panels is defined smaller than in the previous examples, because otherwise the panels are automatically arranged slightly differently in Kibana, as they do not fit in the dashboard as desired.
The input file blog_example4_vars.json looks like this:
{
    "height": 8,
    "width": 10,
    "columns": 4,
    "number": 20,
    "markdown": [
        {
            "title": "**Swissmakers**",
            "lines of text": [
                "For the joy of technology",
                "Engeneering / Security / Consulting",
                "swissmakers.ch 😊"
            ]
        },
        {
            "title": "**Swissmakers**",
            "text lines": [
                "Simply top!",
                "swissmakers.ch 😊 👍 💪 👍 😄",
                ""
            ]
        },
        {
            "title": "**Code studio**",
            "lines of text": [
                "We build your digital future",
                "Webdesign 🟢 SEO 🟢 Webapps 🟢 Webshops",
                "codeatelier.ch 😃"
            ]
        },
        {
            "title": "**Swissmakers**",
            "text lines": [
                "Your ITC specialists",
                "Engineering, Linux and network security",
                "swissmakers.ch 👍"
            ]
        },
        {
            "title": "**Swissmakers**",
            "text lines": [
                "Your ITC experts",
                "for your private cloud based on Nextcloud",
                "swissmakers.ch 👍"
            ]
        }
    ],
    "dashboard_title": "generated_dashboard_blog_example4"
}
Generating and arranging the panels
blog_example4.json is again the reformatted file with the originally interactively created dashboard.
For example 4, the panel title has been switched off and the font size has been reduced slightly.
        "optionsJSON": "{\"useMargins\":true,\"syncColors\":false,\"syncCursor\":true,\"syncTooltips\":false,\"hidePanelTitles\":true}",

------→\"params\":{\"fontSize\":10,
In blog_example4.json jinja2 elements are now inserted again. Here is the corresponding part of the file with the partially new jinja2 elements:
        "panelsJSON": "{% set global = namespace(row = 0) %}[{% for i in range(0, number - 1) %}{\"type\":\"visualisation\",
------->\"gridData\":{\"x\":{{ (i) % column * width }},
------->\"y\":{{ height * global.row }}{% if (i + 1) % columns == 0 %}{% set global.row = global.row + 1 %}{% endif %},
------->\"w\":{{ width }},
------->\"h\":{{ height }},
------->\"i\":\"09747f18-d4b6-4cb0-a25e-63abf3a9cce8\"},
------->\"embeddableConfig\":{\"enhancements\":{\"dynamicActions\":{\"events\":[]}},
------->\"savedVis\":{\"id\":\"\",
------->\"title\":\"\",
------->\"description\":\"\",
------->\"type\":\"markdown\",
------->\"params\":{\"fontSize\":10,
------->\"openLinksInNewTab\":false,
------->\"markdown\":\"# {{ markdown[i % markdown|length]['title'] }}\\\n\\n{{ markdown[i % markdown|length]['textlines'][0] }}\\\n\\n{{ markdown[i % markdown|length]['lines of text'][1] }}\\n\\n{{ markdown[i % markdown|length]['lines of text'][2] }}\"},
------->\"uiState\":{},
------->\"data\":{\"aggs\":[],
------->\"searchSource\":{\"query\":{\"query\":\"\",
------->\"language\":\"kuery\"},
------->\"filter\":[]}}}}}{% if loop.index != loop.length %},{% endif %}{% endfor %}]",
The 20 Markdown panels in total "number": 20 should be in rows of 4 panels each "split": 4 can be arranged. To do this, the auxiliary variable row in which the line for the panel is defined and which is then used to calculate the y-position. row is initialised with the value 0:
{% set global = namespace(row = 0) %}The loop over the panels is defined slightly differently than before:
{% for i in range(0, number) %}This gives you the loop variable i, which ranges from 0 to number -1, i.e. from 0 to 29 in the example. The upper limit number in the range function is not returned by the function, so you have to use number and not number - 1 as the upper limit. At the end of the loop you have the condition again because of the commas between the panel definitions but not at the end of the array:
{% if loop.index != loop.length %},{% endif %}% is the modulo operator in Jinja2, which specifies the remainder of an integer division. This can be used to calculate the respective x-positions of the panels:
{{ (i) % column * width }}When accessing the elements of the markdown array in the input file, the modulo operator is also used together with the run variable i is used to access the first array element again after the last one:
{{ markdown[i % markdown|length]['title'] }}With the filter length in markdown|length you get the number of elements in the array markdownthat you need here.
As in the other examples, the file must now be reformatted and saved as a complete template. blog_example4.j2 can be saved.
The command
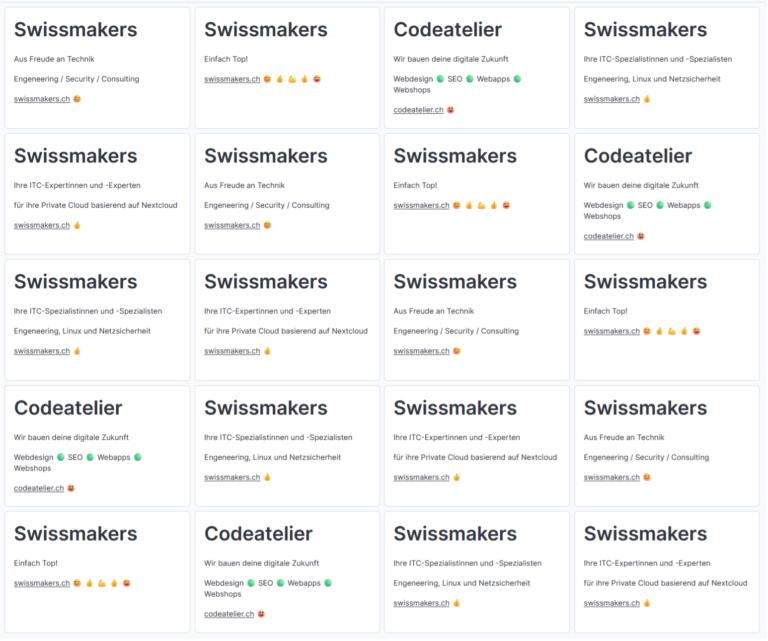
jinjanate blog_beispiel4.j2 blog_beispiel4_vars.json -o generated_dashboard_blog_beispiel4.ndjsonnow generates the following dashboard, in which the Markdown panels are repeated and arranged regularly in 4 columns:
Dashboards with Elastic data
You now know the first examples. Explore the possibility of dashboard generation with Elastic sample data in a few weeks in our next part of this blog post.
Of course, you can always contact Swissmakers for support in creating professional Kibana dashboards.